Install and Setup Instructions for Portal Builder
Portal Builder uses two components for efficient and secure displaying of data on web pages created in WordPress.
The OHT setup file contains a zip file which is a plugin to wordpress, a .war file which are the web services that interact with the Portal and the backend database, a HSF folder that contains information for the webservice to connect to the database and Portal Builder.
The developer needs to install and setup both these components for the working of Portal Builder.
Web Services install and setup:
You need to have Tomcat, WordPress and MySQL installed on your server. You can follow instructions given here to install Tomcat on your server. You can follow instructions given here to install WordPress and MySQL. Tomcat and MySQL do not need to be installed on the same server.
After Installing Tomcat, go to the Tomcat manager webapp on your browser by entering url: http://localhost:8080/manager . You may need to enter the username password for the Tomcat administrator on prompt.
Click on the ‘Choose File’ button under heading ‘WAR file to deploy’ and select the OHT.war file that was provided in your Portal Builder setup.
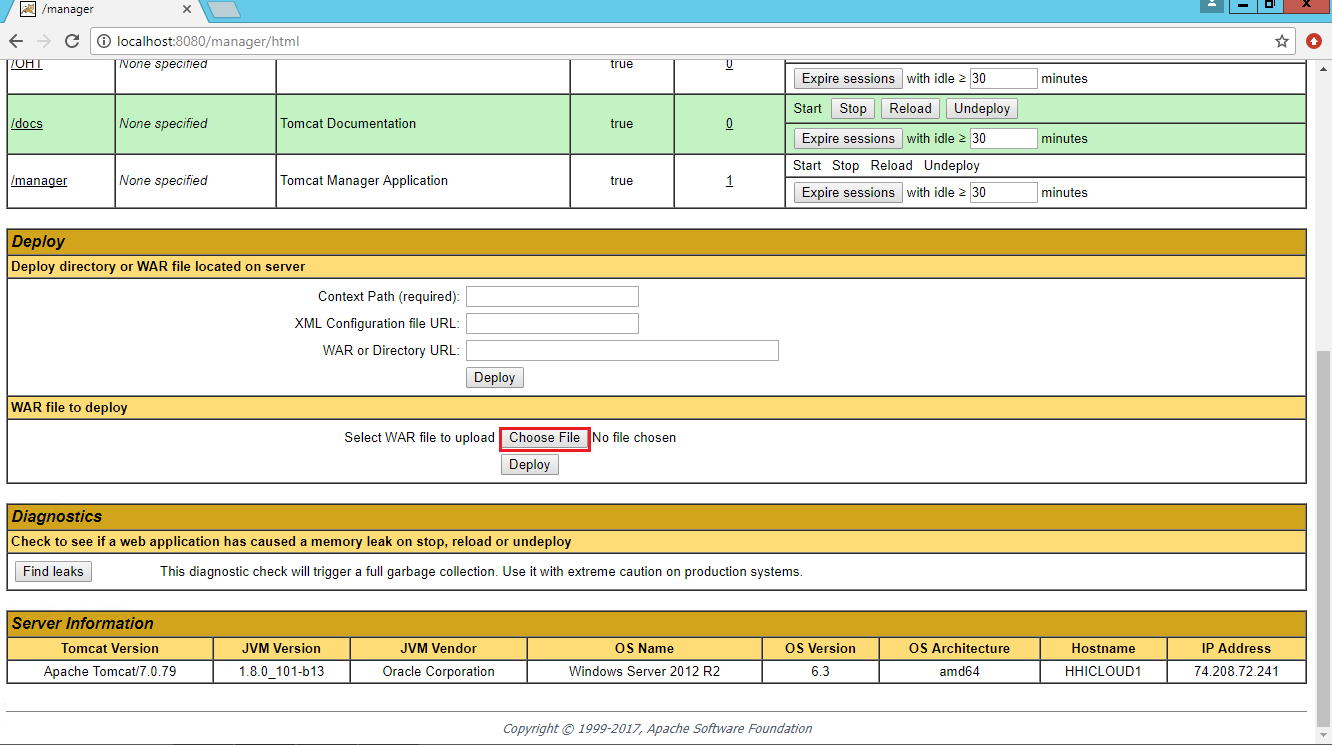
Now click on ‘Deploy’. Your Applications should display /OHT as a path that is currently deployed (Column Running should be displayed as ‘true’).
Web services are now installed on your server.
To setup the web service for Portal Builder, copy the folder named ‘HSF’ that was provided in your Portal Builder setup, and paste it inside the C: directory of your server. Open C:\HSF\Webservice\properties.xml in a text editor.
An example entry for webservice configuration is given in this file. Use this format to create a webservice configuration for your server.
This configuration is the json string and needs to be filled in with the following details:
- Resource: Database ID
- IP: IP address for server on which the webservice is deployed
- MysqlIP: IP address for the server on which MySQL is installed
- Allowed IP: Client side IP addresses (comma separated) that are allowed to call/use your webservice
- Token: A strong token to authenticate the webservice requests on the server
- Domain: Domain name of the webpage on which the webservice is deployed
- Company: Company name
- PortMySql: MySQL port number on which MySQL is installed
- Port: Tomcat port number on which Tomcat is installed
- Username: SQL username to connect the database on the Database ID
- Password: SQL password to connect the database on the Database ID
- MysqlUsername: MySQL username to connect the wordpress database
- MysqlPassword: MySQL password to connect the wordpress database
The entry key and token values can be anything but only need to match those entered in Portal Builder plugin. A strong entry key and token is preferred containing at least one capital letter and at least one number. Save the file.
The tables.xml file defines the tables from Database that should be accessible for functions in Portal Builder. A sample table name and description is shown in the file. You can add as many tables as you need for your Portal builder in the sample format shown.
Procedures.xml file is for the Web services and already configured. No changes should be made to this file.
Web services are now installed and setup on your server.
Plugin Install and setup:
After setting up the Web services, you need to install and setup the plugin.
To install the plugin, login as an administrator on WordPress. In the left menu hover over Plugins and click on Add New (or add ‘/wp-admin/plugin-install.php’ to your wordpress URL). Now Click on ‘Upload plugin’. Now click on ‘Choose File’ and select the OHT.zip file that was provided in your Portal Builder setup.

Click on ‘Install Now’.
Plugin is now installed. You will be able to see a Portal Builder icon in the admin menu on the left.
On installing, the plugin will redirect you to the General Settings page.
Fill in the required fields under Connection Tomcat settings with the values specified in the webservice configuration (properties.xml file)
The fields to be filled in are:
- Company Name: Company specified in webservice configuration
- URL: The url to call the webservice. Should contain http/https, the domain and port number of the Tomcat webservice. Eg: https://www.google.com:8443 (Consider domain is www.google.com and port number is 8843 for Tomcat on that server)
- Client ID: entry key specified in webservice configuration
- Token: token specified in webservice configuration
Layout settings and Custom css are the default Form/List properties and default classes to be loaded on using custom css on Fields/Lists respectively.
Plugin is now installed and setup on your version of WordPress.
Developer should now go to Security Administrator(under the Portal Builder menu on the left) and setup User create and authentication (under ‘Save Users in Database’ on Security Administrator). Detailed instructions for Portal Builder menus and functions is given here.